Sunday, March 3, 2013

Derby Downer

We had our first Cub Scouts Pine Wood Derby Race. 
Vince was so excited and so proud of the car he made.  He had high hopes and big dreams.


Needless to say it didn't go as well as he'd hoped.  Not even close. 
Then it was Brody's turn to run his car in the Family Fun Race at the end of the day.

 
We really didn't know what we were in for with this Derby Race stuff.  (Oh boy could I say a lot about that).  But rather than sounding like a Derby Downer, I'll tell you how we salvaged the day.

We went home and had our own Derby race.

It was the only thing that made the tears subside.

So we went home and gathered 3 cardboard boxes, some Makedo fasteners, Duct tape and a bunch of other things from around the house.  30 minutes later, 100 "is it done yet"s, (a minor hissy fit from me) and we had our track up and running. 


It was a bit more like an X-Games ramp as the cars flipped and flew all over the place.  After I glued some Popsicle sticks to create a guide for the cars, things ran much smoother.
 
We had so much fun watching them play....for hours!  They panicked when we cleared it out Sunday night, so it now resides in the basement playroom. 

The boys got so much out of that weekend.  We were proud of how well they moved on from their disappointing day.  We'll do better at the Derby Race next year, but our cardboard box derby will be the tradition we hang on to. 
 

Friday, January 25, 2013

Taking it slow

Wow!  It's been a long time since I've posted.  2012 flew by so fast and I always felt like I was chasing my tail.  Already, I can't believe January is almost over.  But so far I've been very productive!  My plan for this year is to take things as they come...slow and steady.  Someone I truly admire gave me that advice and I plan to take that seriously this year-Thanks Emy! 

I'm taking care of my boys first and foremost.  First grade has been quite a transition for us and this is my last year with my little one home every afternoon...Kindergarten here we come.  I can't believe I have to register my baby for KINDERGARTEN already!  Not to mention my husband went back to school for his MBA.  Working part time at a great job from home has been such a blessing and I plan to take advantage of it.  I'm spending time with my kids, getting long overdue projects complete at home, and taking on custom projects as they come. 

First up is to share some projects I should have posted long ago.  This was my first custom piece I'd ever taken on for a non-family member or close friend. I had a request to transform an old wicker relic into something a Harley Driving bachelor would want in his rec room. 

 
I never would have thought to do this, but once I saw the low profile and clean lines I knew it could work.  Even though is was a roadside find, I was so afraid of screwing it up!  It took me many painstaking hours, but it turned out better than I could have expected!  Let me know what you think...


Also, I've heard I may have some browser compatibility issues.  Please let me know if you had trouble viewing in the comments.  I'll have to start figuring out a solution.

Thanks all!
Lisa

Saturday, September 15, 2012

Monday, July 2, 2012

A quick update...

No pictures for this post, but since it's been a while I thought I'd give a quick update.  Summer has been great so far.  Very busy, lots of vacations planned.  In between trips I'm trying to stay caught up on work and painting.  I have 5...yes 5 pieces I'm finishing up this week to put in my booth.  I started setting up a booth at a local farmers market and that seems to be going well.  I have so many pictures to load and edit to share.  Can't wait to get back in the swing of things!

Ok, so one picture.  This is what the kids and I created for a special little girl's birthday.  They are moving soon so I wanted to create something special she can take with her to the new house....where ever that may be.  Not only will her fairy garden get to come with her for the big move, but so will her new fairy friends!


The boys started with the ladder.  They wanted the fairies to be able climb in and out of the little garden.  The clay leaves and logs fire pit were my favorite.  We added a bridge and some stepping stones.  I had intended on using some glass stones for the path, just to add a little sparkle, but the boys burried them instead.  Then added some shovels to the mix.  They thought it would be fun for the fairies to dig for burried treasure. After creating the little bunting banner we were all set.  Apparently our fairy garden creation was a hit!  I'll definitly be doing this for my nieces next....or for the boys.  They want to add one to our garden once the landscaping is done.

Well, that's it for now.  I'll update again soon...well, maybe August!

Thanks for stopping by!

Lisa

Thursday, June 7, 2012

Paper Wreaths

Hi Everyone!  I've been super busy with t-ball and end of school activities.  Now that it's all come to an end, I finally have some time to blog!  Ugh...I just reviewed my pictures from Kindergarten graduation and I just can't do it without tears.  We had such a wonderful 3 years at our little school that I just can't imagine my little man's life without these wonderful people in it everyday.  I can't imagine how I'm going to feel when my youngest graduates Kindergarten.  (As I write this with tears streaming, I start to think about all the questions I get about how I'm going to handle High School graduation-honestly, I cannot fathom it).

I first wanted to share the adorable teacher gifts I made this year.  We send our kids to a Lutheran school for Pre-school through Kindergarten and my Mom gave me a hymnal she found for the perfect project.  It had to get me through 3 Pre-school gifts, 2 Kindergarten gifts, and 3 Administration gifts.  It it was perfect.  I even had some tears.  Hopefully they weren't appalled that I tore up a hymnal!
I loved the way they turned out.
I also made a wreath to raffle off for our annual golf outing.  My husband is the founder and president of a non-profit baseball league called the Miracle League of Northwest Ohio.   I took a program from our local minor league team and made a colorful wreath out of it.  I need to make one for myself though.  I think it looks great on my door!
Let me know what you think! 
Thanks or stopping by!
Lisa

Sunday, April 22, 2012

Transformations

Here are a couple more pieces I just finished.  I've already priced them and taken them to Lalah V's but woke up this morning thinking of two wonderful places to put them in my own home.  If you walked into my house today...other than the mess in the garage and in my office...you'd never know what I've been up to. 

First up, the pie safe.  (Forgot the before pictures, but this did have doors on it.  I took them off to use in another project)


I glazed both the inside and outside of the piece and lightly distressed it.  I used vintage sheet music to create the tree.  The picture of the details really didn't turn out great, but it looks pretty amazing in person-if I do say so myself :).  It's not pictured, but I glazed over the tree to bring out the  edges of the sheet music leaves and branches.

Next up, the table.  I love the lines of this table.  Especially the legs.


Yes...I pulled out the painters tape again! 

I knew what I wanted to do with this piece as soon as I saw it.  I pulled inspiration from some pictures I saw from a store called
Sticks and Bricks -Love love love what they do! 

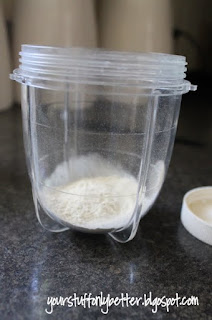
I've been sweeping up the dust from distressing my Annie Sloan Chalk Paint pieces and this is what I've accumulated so far.


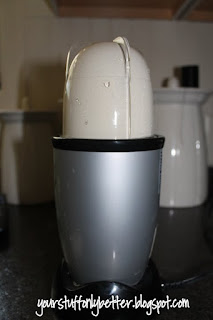
I needed a color wash for this piece, so I thought it would be the perfect time to try out a technique I read at Paint in My Hair.  I can't find the post now, but I just added hot water and put it in my little bullet blender until I had the consistency I wanted.  Talk about recycling!


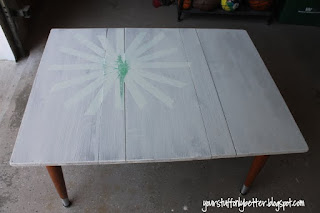
This is how it went on.


It needed some color, so I added a yellow and a blue color to the 2 smaller boards on the top.  I sand off a lot of the paint to make it look old and worn out, peeled off the tape and Voila!


I did end up having to sand down and re-stain the legs.  Once I peeled off the tape I realized that the base was much more yellow than the top. 

I finished this one off with a couple coats of poly.  I know I say this about every piece, but I really do love this one.  It would be a great coffee table.  It's a little on the tall side, so kids chairs fit perfectly under it for a play room or kids room table. 

Thanks for stopping by!

Sharing at


Miss Mustard Seed


Sunday, April 15, 2012

I love tape!

This little desk/entry table sold in record time for me!  I didn't even get a chance to blog about it.  The pictures I took just did not do it justice, so I had planned on taking some more pictures in the store tonight....but it was gone.  Yay!

Here is what it looked like when I bought this desk at the Wood County Habitat for Humanity ReStore a few weeks ago.

Well, it has been sanded, puttied and it has a coat of grey primer on the top already...almost forgot the before picture.


I knew what colors I wanted it to be, but wasn't quite sure how to put my stamp on it.
I'm learning that I just need to start working and see where things take me.
This is what I ended up with:

Started with Grey Primer then I used a blond paint on the top and drawer front.  Then I took painters tape to make flower petals and a stem.  For the petals, I rounded the ends off with scissors and I also cut the tape to shape up the stem.

I forgot to take a picture.


I put a coat of Annie Sloan's Old White on the entire desk.  After it dried, i peeled up the tape to find....


It took me a couple of days to get up the nerve to put some shading and detail into the flowers.  I wasn't sure if I was going to hand paint it or if I should sand it down to expose the other layers....I'm glad I decided to sand!


I lightly distressed the whole piece and used 3-4 coats of poly to finish it up.


Leave me a comment below or on my facebook page and let me know what you think!

I really need to figure out this camera!

Thanks so much for stopping by!
Lisa

Here are some other fun little projects I've done using tape.


Sharing at
Miss Mustard Seed


Monday, April 2, 2012

The Things Little Guys Say

Every now and then, I'll have to add a few things about my stinkin' little monsters.  Here's a little blurb from the ride home from school with my 6 year old.

"Mom, how did you feel when I was in your belly?"
"I was so excited to meet you."
"Yeah, but you were a little scared right?  Scared they were going to cut your belly to get me out?"
"Uh, yeah?.. Sure.  I was a little scared." 
I didn't have a c-section so now I'm getting nervous about where this is leading.
"Well, when Aunt Erin was having her kids, did you wish you would have kids too?"
"Yes!  I was wishing for you".
"Well...Lucky you."

What?!  It took all I had to hold together.  Just the way he said it.  With his head cocked to the side while shrugging his shoulder.  Ugh!  He's so funny sometimes.

Then to end the conversation he says,
"Sometimes your wishes and dreams come true...You know, like Martin Luther King Jr."
Oh, how I love him!

Saturday, March 24, 2012

Okay Moms, do your kids' closets look like this?


I have 2 boys sharing this closet.  They both change their clothes about 10 times a day!  I got sick of cleaning it up and have it look like this again 10 minutes later.  Then to have my neat-freak husband come home from work and freak out!   
So a couple of weekends ago I went for the closet organizer.  I had my kids come with me to the big box store, climb up on the display and kick the tires for me.  Oh...they loved that!  We found the Rubbermaid closet organizer would probably hold up the best and it looked easy enough for me to install myself. 
After one sleepless night and rearranging every drawer and every shelf about 10 times, this is what I came up with.  And this is what it looks like 2 weeks later! 

Ahhh, sweet success.
The first couple of days I just wanted to sit in their room and look at it.  It took 3 trips to the store for hangers since we didn't have any, but every lick of clothing they own is in there.  I even had room at the bottom for 3 of the bins to hold some toys.
It's amazing!  They only get out the shirt they're looking for.  No more tearing the drawers apart looking for the shirt that looks like Vinnie's from "The Sandlot". 

Now..for the rest of the house.
I WILL conquer the clutter...one closet at a time.

Friday, March 23, 2012

New Painted Ethan Allen Piece in the Store this weekend!

This is another piece I'm having a hard time letting go of.  I can think of 3 rooms in our house this would look great in. The bedroom especially.  I have big plans for this room and this piece would be perfect!  Maybe it won't sell?


It started out as really dark brown Ethan Allen Hutch...


And turned into a wonderful one of a kind!


This one took me a long time to complete. I tried a few new things on this one.
1st-Annie Sloan Paint.
2nd-Painting Circles!
3rd-WAX.
I wasn't sure I would like the finish of the wax. The last coat took a long time to harden, but it looks and feels great! I really do love it.


I also tried a new paper piece.  Love this one too!

Leave a comment and let me know what you think!
Linking up here...
Hopefully I did this right:)!

Funky Junk's Sat Nite Special
French Country Cottage 

Also Linking to Miss Mustard Seed


Photobucket